Overview: Change the layout of your schedule
SuperSaaS offers plenty of options to customize the look and feel of your schedule. This ranges from your schedule’s dimensions and the time format to the content of different system messages and the colors of individual schedule and user interface (UI) elements.
- Views and appearance: how the schedule looks on screen
- On-screen text: messages shown during booking, login, and checkout
- Email and SMS: confirmations, reminders, and follow-up messages
- Account-wide settings: defaults such as language, time zone, terminology, logo, and UI colors
While some layout settings relate to individual schedules, others affect every schedule in the account. In this section, similar settings at schedule and account level will be discussed. Account related settings will be pointed out as such.
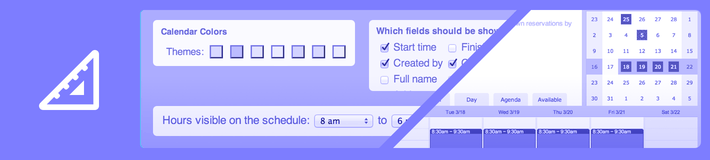
Adjusting views and their proportions
A schedule provides different “views”, ways to look at the schedule, such as showing the calendar by day, week or month, or as a list of available spaces. You can change which views should be available to the end user and configure various settings such as size.
Customizing on-screen messages
Choose this page when you want to change text shown directly on the website during the registration, booking, or payment flow. Text can contain so-called ‘auto-text’, which are ‘magic words’ that are automatically replaced by some dynamic value when the message is generated.
Customizing notifications and reminders
Choose this page when you want to change email or SMS messages such as confirmations, reminders, follow-ups, and registration emails. Reminder and follow-up messages can be similarly customized.
Changing a schedule’s appearance
Choose this page when you want to change colors, visual indicators, your logo, or other visible design elements. The visual appearance of the schedule and the overall UI can be configured separately. You can change your schedule’s color palette by selecting another color theme or pick your own color for each of the different calendar elements. At account level, you can do something similar for the UI colors. The appearance of the header and footer is also configured at the account level.
Using a custom domain
Creating a custom web address allows your users to access your schedule with a link such as www.your-company-schedule.com.
Links in confirmation emails will also use this domain. This helps reassure users that the schedule belongs to you.
General settings
Choose this page when you want to change account-wide defaults such as date and time format, language, time zone, or the terminology used for your users. At the account level, you can change the default date and time format, as well as the time zone and default language. You can even change the term the system uses to refer to your users into something more appropriate like ‘students’.