In this tutorial we set up an appointment schedule for language lessons. A lesson requires the availability of a teacher, and the teacher’s availability is determined by another schedule. This is an example of a “service schedule” connected to a “resource schedule”.
If you require group events like classes, the capacity schedule tutorial would be a better option. When you are planning to schedule only one person’s time, you can still use the service schedule as a standalone, or you could have a look at the resource schedule tutorial.
If you want each teacher to have their own personal schedule, combined into one schedule, see the advanced service schedule tutorial.
Note that there are a few differences between a resource schedule and a service schedule. While the resource schedule allows repeating appointments and arbitrary appointment durations, the service schedule enables services to take into account the availability of multiple calendars. Some of our customers prefer the appearance of one over the other.
It should be straightforward to use this tutorial for another service, for example, a repair service that requires the availability of a mechanic and a work bench. Or to book a treatment with a therapist that requires both a treatment room and a therapist to be available.
Booking a service
If you offer a number of services, you can create a list for your customers to choose from. Use the steps that follow to learn how to create an appointment schedule for several types of language lessons requiring the availability of different teachers (as resources).
This tutorial demonstrates the following customizations:
- Using the schedule to offer a number of services
- Connecting the service schedule to a resource schedule
- Collecting payments with each service booked
You can view the end result on the language school demo. It’s possible to modify that page to make it appear as part of your site, but you can also integrate a SuperSaaS schedule as a so-called “widget”. A widget can appear as a small frame on your site, or as a small button, like the one below. With a widget, users can view availability and create a booking, but to change or cancel a booking later they will need to use the full schedule link, for example from their confirmation email.
Setting up the schedule in 5 easy steps
The easiest way to set up an appointment schedule is by using a build-and-test cycle: After the initial configuration you try it out, make changes, and repeat, until it works the way you want.
Step Setting up a basic schedule using the New Schedule Wizard
Select the type of schedule
Click New Schedule on your Dashboard. You will see the New Schedule Wizard, where you will first need to choose the schedule type: a Resource, Capacity or Service schedule.
We start with creating a separate resource schedule that will contain the availability of the teachers. Using a resource schedule (which allows people to book one-on-one time with a person, item or specific space) for scheduling teachers’ time ensures that they cannot have two appointments that overlap.
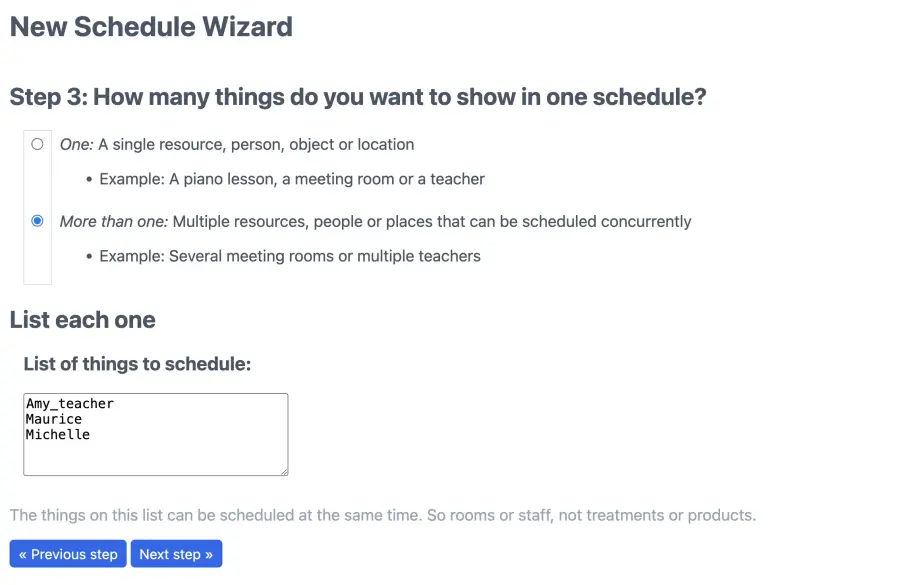
After selecting Resource schedule, select Internal use, because this schedule will not be shown to your users directly. Then opt for More than one to add multiple resources. For this tutorial, add “Any teacher”, “Maurice” and “Michelle”.
Next, name the schedule “Teachers”.
You can now set some basic constraints and click Finish. Later on you will be able to set different “opening hours” for different teachers.
As an aside, you could also put each teacher into their own schedule. This has the added benefit that you can give each teacher access to only their own schedule, possibly connected to their Google Calendar. We’ll put all teachers into one schedule here to make this tutorial a bit simpler.
You are now ready to return to your Dashboard to set up your appointment schedule. Click the New Schedule once more. We will now create a “service schedule” that draws on the availability of teachers from the resource schedule we created in the previous step. So, select Service schedule from the list of options.
Decide if users need to log in
You can require users to create a username and password on your schedule, or you can simply allow anyone who visits the schedule to create an appointment. For this tutorial we’ll select “No log in necessary”.
Name your schedule
The title you give to your appointment schedule in combination with your account name forms the URL that your clients will see in their browser when they use your schedule. Provide a short but descriptive name for the schedule.
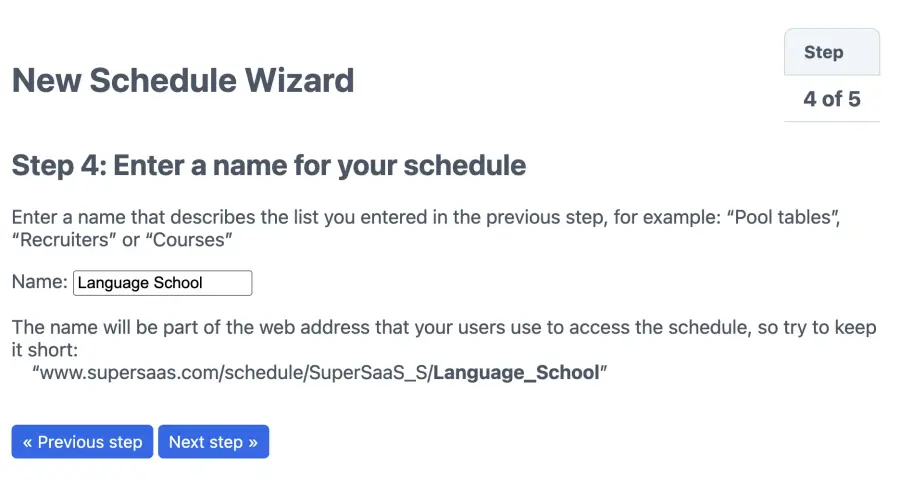
You can always change it (as well as your account name) later. Note that if you do so, the schedule’s web address will change accordingly, and you will need to inform your users. For this example, enter “Conversation lessons” and click Next.
List your services and connect resources
You now have the option to list your services and apply default duration values if needed.
Assuming you already created the resource schedule, you can use the selector next to each service to define which resources are required for the service to become available. Enter “English conversation Beginner” as the first service and connect it to the resource schedule “Teachers”. If all the teachers can teach that class, you can enable the resources to link to “Any teacher”. If only some of the teachers can teach that class select them and ensure the switch is set to “or”. You can also set opening hours and time constraints on this screen that will apply to all teachers.
Enter a second service, for example, “French conversation Beginner” and because only Maurice teaches French, you can select resource “Maurice” from the “Teachers” schedule.
Note that if you define only a single service the user interface will adapt to hide the service selector widget.
Clicking Finish creates the schedule and makes it available online. Step 2 will show you how to test your schedule to ensure that it works as expected.
Step Trying out the schedule to see if it works as expected
Regular users will see the same appointment schedule but with fewer options. You can also find the Use button on your Dashboard page. You can access your Dashboard via the menu in the top right corner of your screen. Furthermore, you can also bookmark the page in your browser for daily use.
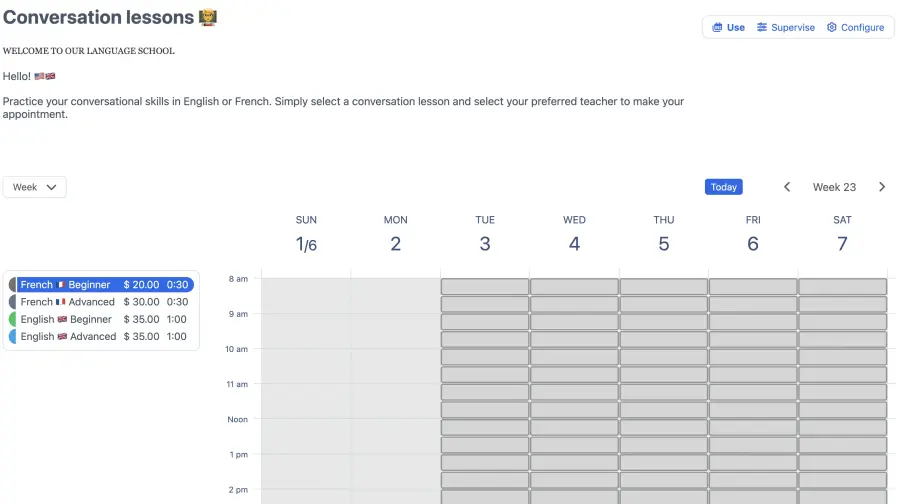
Booking a lesson
If you have created more than one type of lesson, you will see them in a column on the left side of your schedule. To book a lesson, click one of the available times and edit the details.
When you click Create reservation, the schedule updates to show your booking and adjusts the remaining availability accordingly. Appointments that are linked to resources will show up on the resource schedules. This ensures those resources will no longer show up as available to subsequent users, but note that they cannot be edited there. Clicking on a resource will provide a popup with a link to the schedule where it can be edited. If the same appointment shows up in multiple schedules that are linked, it still only counts as a single appointment in your subscription usage.
If you would like to edit an appointment, click on it again to make changes. Be sure to click Update reservation before closing it, otherwise you will lose the changes.
Step Adjusting the configuration
Click Configure to go to Overview for a summary of the different options you can adjust. Here, you can temporarily block the appointment schedule or delete it entirely.
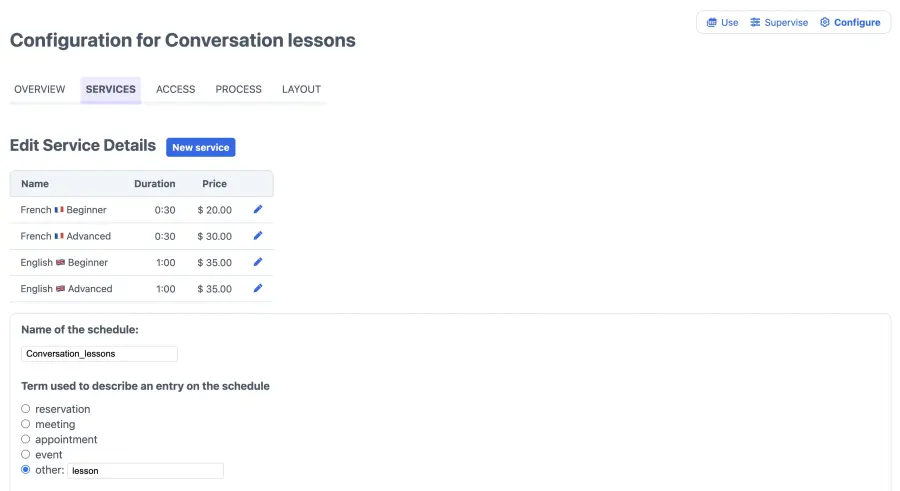
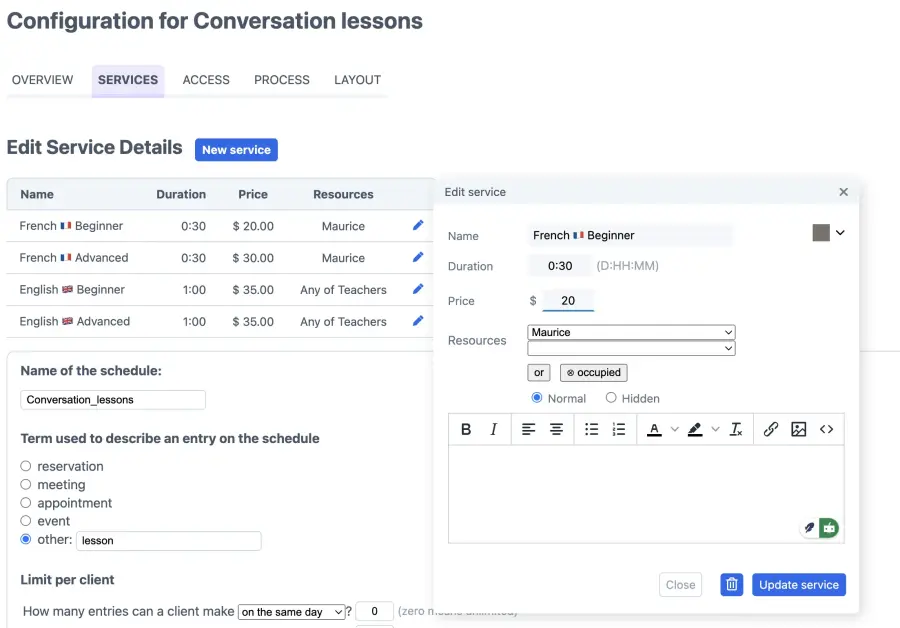
Configuring Services
The Services tab lists the services available and how they relate to resources. The top half of the screen lets you create and update your services. You can click and drag the rows to change the order in which the services are listed.
Create a new service
When you click New Service, or click the edit icon of an existing service, a window appears where you can change the details. You can also change the color of a service by clicking the colored box in the top right corner of the window.
The radio button Hidden (next to Normal) lets you create a service that is only available to the administrator and superusers. Hidden services do not appear in the service list that your clients see.
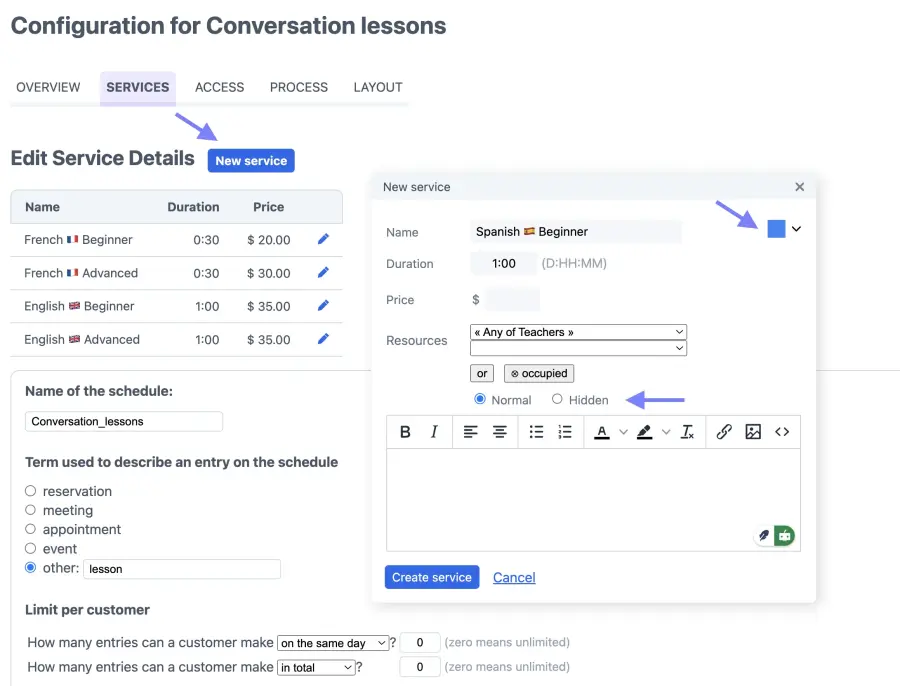
In the field at the bottom of the editing window, you can enter a description of the service that will appear when the service is selected. It can contain formatting and pictures but note that you can only link to pictures that are available online.
Specify resources
If your account contains any resource schedules, the service editing window will also contain a section marked Resources where you can indicate which resources from these schedules need to be available when making an appointment. For example, you could specify that a lesson needs both a specific teacher and a specific classroom. Or, if more than one teacher can give a lesson then you can click the “or” button and list each one.
To add new resources, go to your Dashboard, click New Schedule, and select the Resource type schedule. You can also add additional resources to an existing resource schedule via the Resources tab.
Configure general settings
Under Term used to describe an entry, you can specify how you want to refer to an appointment, for example you could call it a “meeting”. You can select a term from the list or use your own custom term that will describe your service appropriately. In this example, “lesson” is the most suitable term. This term will be used in all dialog windows, help text and email confirmations.
You can also change the term used for “user”, for example changing it to “student”, under the Layout settings.
Limits per user
Next, determine the number of appointments a client can make on your schedule. After the maximum is reached, appointments can only be changed or deleted.
When a service depends on one or more resource schedules, any limits set there apply here as well. So you can tell a user to make a maximum of four appointments, but only two of those can be with a particularly popular teacher. If the checkbox Multiple reservations can take place at the same time is not selected, the schedule will behave as if there is a single resource that is needed for each appointment. You would uncheck this box if only a single service can be booked at a time (e.g. you have only a single classroom that needs to be available).
Constrain start times
Creating a grid consisting of predetermined available times usually provides a better user experience than leaving the time unconstrained. You can enter suitable start times in the Constrain start times to field. Students can then pick a time by simply clicking on a time slot.
If you offer a service that depends on an interchangeable resource, the system can show the client a drop-down menu of available resources from which to choose. In this example, students can select a preferred teacher.
If you offer more than one service, you can select the order in which services will be presented by dragging the services with your mouse.
Add a price
The “Price” field allows you to charge a fee for a booking. By clicking Setup pricing you can create advanced pricing rules that change the price based on specific conditions, such as the day of the week. This is discussed in detail in the section Adding payment to your schedule.
Step Testing the schedule from a visitor’s point of view
Every appointment schedule has its own URL, which can be viewed via Configure under Overview. Importantly, the schedule looks a bit different to you than it does to your users.
Your users will not see the Supervise and Configure buttons, and will typically not be able to see and change the appointments of other users. To view the schedule from your user’s point of view log out as administrator with the link in the top right menu, and then go back to the schedule page. You can speed up this process by using a second browser, or by using an anonymous browsing tab, the section “Testing the schedule you created” discusses this in detail.
