In this tutorial we set up an online appointment system for group events, such as fitness classes. With some small modifications you can use a similar setup for many different purposes. If you need to schedule group excursions or a corporate training session, for example, this tutorial will apply just as well.
We refer to this type of appointment system as a “capacity-type” schedule, which is used for bookings that can be made by multiple people at the same time. If however you need an online appointment system for a single class or event, the event tutorial may be better suited to your requirements. On the other hand, if you want to take only a single booking per time slot, then the resource schedule tutorial is probably more helpful.
Signing up for a group event
A distinguishing feature of this type of schedule is that the administrator can define and add available slots with a predetermined capacity. Individuals can only make bookings for predefined time slots and they cannot make random bookings outside the slots.
This online appointment system is suitable if:
- you have more than one event
- you need people to select an event date from a calendar
- your event has several components that can be selected separately
This tutorial demonstrates the following customizations:
- using the schedule to plan group events
- adding a location field
- collecting payment with each participation
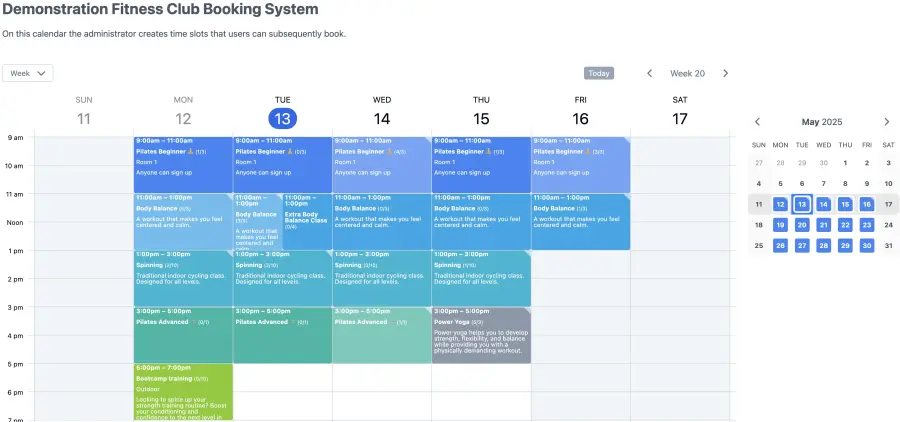
You can view the end result on the fitness studio demo. It’s possible to modify that page to make it appear as part of your site, but you can also integrate a SuperSaaS schedule as a so-called “widget”. A widget can appear as a small frame on your site, or as a small button, like the one below. With a widget, users can view availability and create a booking, but to change or cancel a booking later they will need to use the full schedule link, for example from their confirmation email.
Setting up an online appointment system in 5 easy steps
The easiest way to set up an appointment schedule is by using a build-and-test cycle: After the initial configuration you try it out, make changes, and repeat, until it works the way you want.
Step Setting up a basic schedule using the “New Schedule Wizard”
Step Adding a class to the schedule
To use your online appointment system as an administrator, click the Use button. Note that this button is only visible when you are logged in as an administrator.

Regular users will see the same appointment schedule but with fewer options. You can also find the Use button on your Dashboard page. You can access your Dashboard via the menu in the top right corner of your screen. Furthermore, you can also bookmark the page in your browser for daily use.
When you enter your online appointment system for the first time it will be empty. Much of what you see here can be configured by adjusting the views and their proportions. For example, you can choose to show a day, a week or a month at a time.
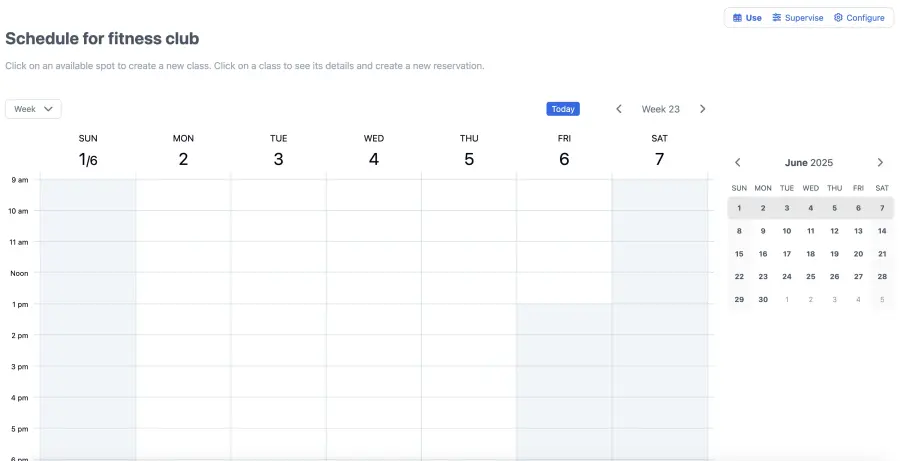
Create a slot for a class
In the schedule, click on the time you would like to create a class. A New Slot popup window will appear. If this window is in an inconvenient place you can simply drag it to a more suitable place on your screen.

Enter the date and a title for the class, such as “Pilates beginner”. In the “Description” field you can add images and explain what the class is about. Images must be available online to be linked here (i.e. the image must start with “https”). Alternatively, you can use the space above the schedule to give a more elaborate description. There are several formatting options under Configure > Layout for this, including changing colors and adding images.
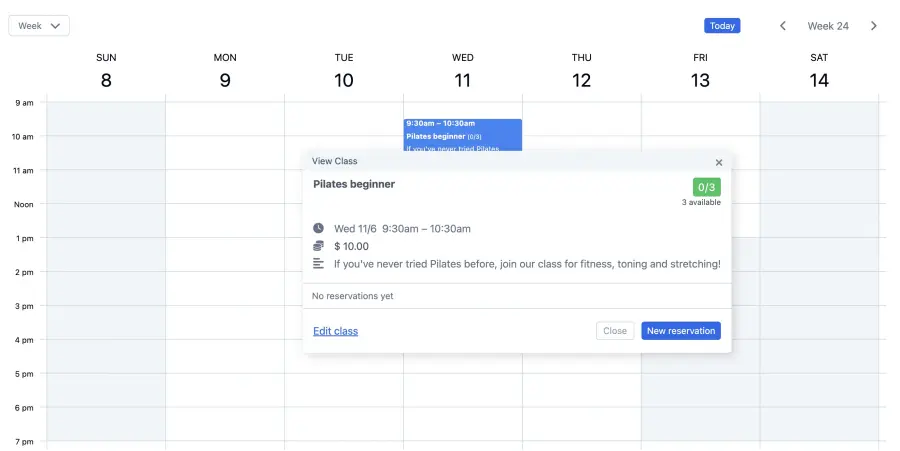
Clicking the slot that you have created will show you an empty class without any signups. The New reservation link is useful if you intend to add participants to your class yourself, for instance if you accept appointments by phone. Note that people using your schedule will see fewer options than you see as an administrator, for example, they will not be able to create a new class.
Make a booking
Click New reservation to create a client booking. By default, the system only asks for a name, but you can configure additional details under Configure > Process. Save the booking by clicking Create reservation.
The class now shows “1/3”, which means one place is occupied out of three available places.
A green check mark indicates that this slot contains a booking that we created. This is convenient for your customers as it lets them quickly see which classes they have signed up to attend.
Edit the class
You can make changes to a class by clicking on Edit Slot. If you change details of a class, such as the starting time, all bookings for that class will be moved to the new time.
Step Adjusting the configuration
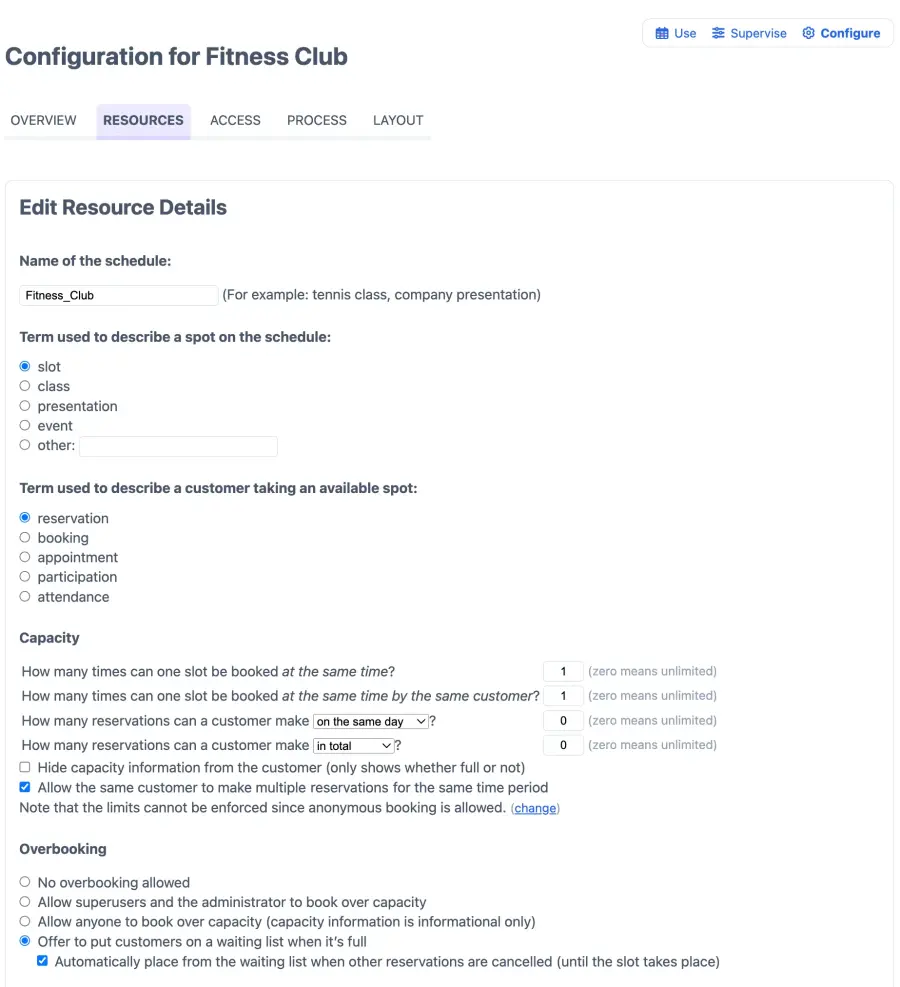
Configuration Screen
Click Configure to go to Overview for a summary of the options that you can adjust. You can also block your online appointment system or delete it entirely on this page.
Determine resource parameters
Resources contains the settings that define the general parameters of your online appointment system. The first option deals with naming the resource appropriately, which in this case is “Fitness Club”.
The terms you select to be used instead of the default names, “slot” and “booking”, will be used throughout the system – including error messages, email confirmations and help pages.
Set the capacity
When you create a new class the system will propose the default you set in the first step, but you can adjust it for each class. Entering a dash will switch off limit checking entirely, entering zero will not allow anyone to sign up.
The second field determines how many places an individual can book at once for a class. Setting this value to anything other than 1 will change the user interface to include a quantity field when making an appointment.
For a fitness class, it may be suitable to leave this as 1, but if you were selling tickets to a play, for example, you would allow people to buy multiple tickets at once.
Next, you can specify how many bookings someone can make in total for all classes. You can also specify whether this total should include past bookings. When the maximum is reached your client can only change or delete existing bookings. You can specify a separate limit for the number of appointments that can take place on the same day, week or month.
There are two checkboxes that determine whether participants are allowed to make multiple appointments for the same time period, and whether the capacity information is visible to other people than yourself. Note that the system can only determine if someone is “the same person” by their login name. So if you allow people to create their own login name (or if you allow anonymous bookings), then the system cannot prevent people from making a second appointment by creating a second login name.
Configure the waiting list
Overbooking refers to the waiting list. You can determine whether you want to be able to override the capacity limit, or rather place participants on the list until a booking is cancelled. A separate list is created for each class and, if the box for automatic placement is checked, the order in which people enter their names determines who will be offered a place if there is a cancellation.
If you allow multiple bookings per person and someone requests more spots than are available, they will be moved to the waiting list. Upon booking, a quantity field will appear that allows participants to enter the number of places they want to book.
Add a location field
You can specify where your classes take place by adding the address to the location field. For online classes this field can be used to enter a meeting link. If you publish your calendar this information is also transferred to the appropriate location field in the connected calendar.

Set price and time
You can set the price of your event or add online payment. The value you enter here is merely a default that you can adjust for each individual class if needed. By clicking Set up pricing, you can create advanced pricing rules.
Note that setting a price does not mean you actually have to charge people through the site. You can choose to display a price but arrange payment in another way. You can find more information about using pricing rules and payment methods under Payment.
Under Time, you can set a default length for slots and modify the user interface for time display. Rounding all times to whole days can be a good idea if you are using your online appointment system for events that take place over multiple days.

Define access control
The system also provides settings for who can sign up for your workshop. You can, for instance, ask participants to create a login or allow anyone who can see the schedule to sign up for your fitness class. Find out more about the access options under Controlling access to your schedule.

Step Testing the schedule from a visitor’s point of view
Keep in mind that your online appointment system looks different to you as an administrator than it does to visitors. Your users will not see the “Supervise” and “Configure” buttons, and will typically not be able to see and change the appointments of other users. To see the schedule as a regular visitor, log out and return to the schedule as a regular user. A good alternative for having to switch back and forth between administrator and user modes is using a second browser. You can then use one of the browsers to log in as administrator and the other to log in as a user.